 Previzion
Timeline
On the timeline you decide when and how people, things and cameras move. You move and shape the keys and blocks laid on each row in time.
On a Mac, press ⌘ instead of Ctrl and Option instead of Alt.
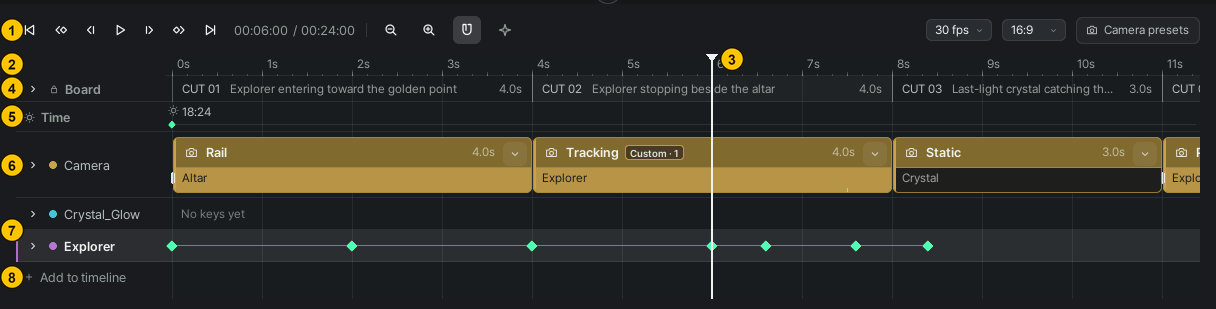
| # | Name | What it does |
|---|---|---|
| ① | Toolbar | Plays the scene, sets the scene length and aspect ratio, and opens Camera presets |
| ② | Ruler | Press it to go to the moment you want to see |
| ③ | Playhead | The moment you are looking at. The preview shows this moment |
| ④ | Board | Splits the cuts and changes their lengths |
| ⑤ | Time | Changes the time of day (sun · moon) in the scene |
| ⑥ | Camera | Place and shape camera blocks → Cameras |
| ⑦ | Object row | Sets the movement of a person, thing or effect with keys |
| ⑧ | Add to timeline | Makes a row for an object that does not have one yet |
Reading the rows
Movement is set by the keys on each row. Each ◆ key on a person's or thing's row holds its position and direction at that moment, and between keys it moves smoothly. Double-click an empty spot to add a key. The Time row takes time-of-day keys the same way.
Press the arrow to the left of a row's name to unfold its detail rows, such as animation, rides and lighting. → People · objects · vehicles · Lights · effects · time of day
A person or thing needs a row before it can take keys. Press the Add to timeline row at the very bottom and pick the object.
Playing and moving the playhead
To see a given moment, press or drag on the ruler. For an exact moment, press the current time in the toolbar and type something like 2.5 (seconds). Space plays and pauses, and , / . jump to the previous and next key. The other keys are under Shortcuts.
Every key except Space works once you have clicked the timeline. Elsewhere, End drops the selection to the ground.
Zooming and scrolling
To look at a stretch closely, hold Ctrl and turn the wheel; it zooms around the mouse. Shift+wheel scrolls through time, and Ctrl+0 fits the whole scene in view.
Selecting keys and blocks
To move or delete several keys at once, select them together first. Ctrl+click adds or removes one at a time, and Shift+click selects everything from the last one you pressed to where you click. Dragging from an empty spot selects everything inside the rectangle.
On the Camera and Time rows, hold Alt while you drag to select with a rectangle.
Moving and editing the selection
Drag selected keys and blocks to move them; copy and delete them from the right-click menu or with shortcuts.
- Drag one of the selected items and they all move together, snapping to nearby cuts, blocks and keys. With snapping turned off in the toolbar, hold Shift while you drag to snap.
- Copy Ctrl+C · Paste Ctrl+V · Duplicate Ctrl+D · Delete Delete. Pasting puts the items at the playhead.
- To carry just one key's position and direction over to another key, right-click → Copy value, then Paste value on the key it should go to.
Changing how it moves
To make starts and stops smoother, select a key and press a number key, or pick from right-click → Transition. It changes the movement from the selected key to the next one.
| Key | Transition | Feel |
|---|---|---|
| 1 | Automatic | Fits the movement before and after it naturally |
| 2 | Linear | The same speed from start to finish |
| 3 | Step | Holds still, then jumps at the next key |
| 4 | Ease in | Starts slowly |
| 5 | Ease out | Stops slowly |
| 6 | Ease in-out | Starts slowly and stops slowly |
| 7 | Ease in back | Pulls back a little, then starts |
| 8 | Ease out back | Overshoots a little, then settles back |
Trimming camera blocks
What happens when you drag a camera block depends on where you grab it.
- The body: moves it to another time.
- An edge: changes its length, stretching or shrinking the movement with it.
- Alt+edge: leaves the movement alone and changes only the still stretch at that end.
To pick up where the previous block's shot ended, right-click → Join to previous block.
Changing the scene length
To lengthen or shorten the scene, drag the handle at the right end of the ruler, or press the total length in the toolbar and type it. It will not get shorter than the end of the last key or cut.
Splitting cuts and changing their length
Cut spans are edited on the Board row.
- Drag the border between two cuts: the cut before grows by as much as the cut after shrinks.
- Right-click → Split cut at playhead splits a cut in two.
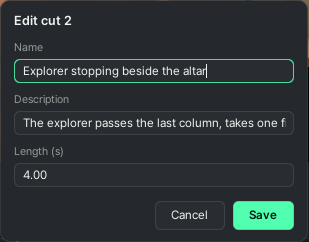
- Right-click → Edit cut… edits the name, description and length.
Tidying the rows
Drag a row's name to change the order. To remove a row, right-click it in the Objects list → Remove from Timeline. The object stays in the scene.
Changing the frame rate and aspect ratio
Pick the movie's frame rate and aspect ratio from the two lists at the right of the toolbar. Aspect ratios range from film ratios such as 2.39:1 to 9:16 for vertical video.
Related: The Scene page and the 3D view · Cameras · People · objects · vehicles · Fixing with AI · Shortcuts
Anything not covered here: ask in the open chat or write to 17iayn@gmail.com.